Hair blog
How to Install Flat-Tip Hair Extensions: A Comprehensive Guide
May
Flat-tip hair extensions are a popular choice for those looking to add volume and length to their hair. Known for their versatility and natural appearance, flat-tip extensions blend seamlessly with natural hair, providing a flawless finish. In this comprehensive guide, we will walk you through everything you need to know about installing flat-tip hair extensions, ensuring a professional and long-lasting result.
Understanding Flat-Tip Hair Extensions
Flat-tip hair extensions combine the best features of I-tip and tape-in extensions. They are designed with a flat tip that allows for a secure attachment using microbeads. This method is gentle on natural hair and provides a natural look. The extensions can be styled, colored, and treated like your own hair, making them a versatile option for various hairstyles.
Benefits of Flat-Tip Hair Extensions
- Natural Appearance: Flat-tip extensions lie flat against the scalp, making them virtually undetectable.
- Versatility: They can be styled with heat tools, colored, and washed just like natural hair.
- Gentle on Hair: The microbead attachment method is less damaging than other techniques, preserving the health of your natural hair.
- Durability: When properly cared for, flat-tip extensions can last several months, providing long-lasting volume and length.
Preparing for Installation
Before installing flat-tip hair extensions, it’s essential to prepare both your natural hair and the extensions to ensure a smooth process and optimal results.
Step 1: Gather Your Supplies
You will need:
– Flat-tip hair extensions
– Microbeads
– A loop tool or threading needle
– Pliers for clamping the beads
– A comb and sectioning clips
– Heat protectant spray and styling tools
Step 2: Wash and Dry Your Hair
Clean hair ensures a better grip for the microbeads. Wash your hair with a clarifying shampoo to remove any product buildup. Avoid using conditioner or any heavy products that may make the hair too slippery for the beads.
Step 3: Section Your Hair
Divide your hair into sections, starting from the nape of the neck and working your way up. Use sectioning clips to keep the hair out of the way and ensure an organized installation process.
Installing Flat-Tip Hair Extensions
Step 1: Insert the Microbeads
Using the loop tool or threading needle, slide a microbead onto a small section of your natural hair. The section should be about the same size as the flat-tip extension to ensure a secure fit.
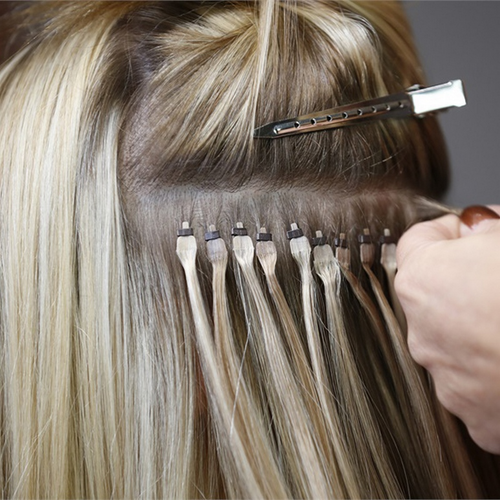
Step 2: Attach the Extension
Insert the flat tip of the extension into the microbead along with the natural hair section. The extension should lie flat against the scalp for a seamless blend.
Step 3: Secure the Bead
Using the pliers, clamp the microbead securely to hold the extension in place. Ensure the bead is tight enough to prevent slipping but not so tight that it causes discomfort or damage to your natural hair.
Step 4: Repeat the Process
Continue this process, working in rows from the bottom of your head to the top. Ensure each extension is placed evenly to avoid uneven weight distribution, which can cause tension and damage to your natural hair.
Post-Installation Care
Proper care is crucial for maintaining the longevity and appearance of your flat-tip hair extensions. Follow these tips to keep your extensions looking their best.
Washing and Conditioning
– Gentle Products: Use sulfate-free shampoos and conditioners to avoid stripping the hair of natural oils and to maintain the adhesive’s integrity.
– Avoid Overwashing: Wash your hair 2-3 times a week to prevent the extensions from becoming dry and brittle.
– Condition Carefully: Apply conditioner from mid-length to the ends of the hair, avoiding the roots and microbeads to prevent slippage.
Brushing and Styling
– Use the Right Brush: Use a brush designed for extensions, such as a loop brush, to prevent snagging and pulling on the beads.
– Brush Regularly: Brush your hair daily to prevent tangling, starting from the tips and working your way up to the roots.
– Heat Protection: Always use a heat protectant spray when using styling tools to minimize damage.
Sleeping and Exercise
– Protect at Night: Braid your hair or tie it in a loose ponytail before sleeping to prevent tangling. Consider using a silk or satin pillowcase to reduce friction.
– Exercise Caution: If you swim or exercise frequently, protect your hair from excessive moisture and sweat, which can weaken the bonds.
Removing Flat-Tip Hair Extensions
When it’s time to remove your flat-tip hair extensions, it’s essential to do so carefully to avoid damaging your natural hair.
Step 1: Loosen the Beads
Using the pliers, gently squeeze the microbeads in the opposite direction to loosen them. Avoid pulling or yanking the extensions out, as this can cause hair breakage.
Step 2: Slide Out the Extensions
Once the bead is loosened, gently slide the extension out along with the bead. If you encounter resistance, apply a bit of hair oil to ease the process.
Step 3: Clean and Store
Clean the extensions and store them properly if you plan to reuse them. Remove any remaining adhesive or buildup from the flat tips.
Choosing the Right Extensions
Selecting high-quality flat-tip hair extensions is crucial for achieving a natural look and ensuring durability. Consider the following factors when choosing your extensions:
Hair Quality
Opt for 100% human hair extensions for the most natural look and feel. Human hair can be styled and treated just like your natural hair, providing greater versatility and longevity.
Color Match
Choose extensions that closely match your natural hair color for a seamless blend. Many suppliers offer color matching services to help you find the perfect shade.
Length and Volume
Consider the length and volume you desire. Flat-tip extensions come in various lengths and densities, allowing you to achieve the perfect look for your hair type and style preferences.
Conclusion
Flat-tip hair extensions are an excellent choice for those looking to add length and volume to their hair with a natural and versatile appearance. By following the proper installation techniques and maintenance routines, you can enjoy beautiful, long-lasting results.
Whether you’re new to hair extensions or looking to try a different method, flat-tip extensions offer a secure and gentle option for enhancing your natural beauty. With the right care and attention, your flat-tip hair extensions will provide a stunning and seamless transformation that boosts your confidence and complements your style.